Before resetting the Epson printer’s waste ink counter, please disable the Epson Status Monitor first.
In this article, We will explain why and provide detailed instructions on disabling the Epson Status Monitor on Windows 11.
You can do the same with other Windows versions per the instructions below.
How to Disable Status Monitor 3 and why you have to
The Epson Status Monitor is a helpful tool that provides real-time information about your printer’s status, including ink levels, error notifications, and print job progress. While it can be handy in many situations, it can hinder dealing with a “Waste Ink Counter” issue.
How to disable Epson Status Monitor on Windows 11:
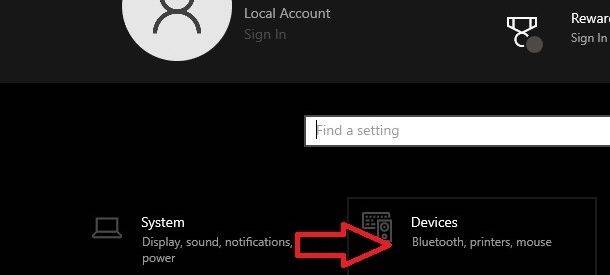
Step 1: Open “Settings” on Windows 11 by click “Start” then click “Settings”

Step 2: From Windows 11’s Settings, click “Devices”

Step 3: In “Devices” click “Printers & scanner”

Step 4: You will see the list of installed printers in the “Printers & scanner” window. Now click on the printer you want to disable the status monitor then click “Manager”.

Step 5: Click “Printing preferences” to continue.

Step 6: In the “Printing Preferences” you will see a “Maintaince” tab. Choose that tab. If you can not see the “Mainteince” tab, please follow this post – How to fix no Maintenance tab in Epson

If you see the Epson Status Monitor 3 icon raised, The Epson Status Monitor 3 is enabled.
To disable Epson Status Monitor 3, click the “Extended Settings” button to continue.
Step 7: Click “Extended Settings” then “Uncheck” in “Enable Epson Status Monitor 3” checkbox.

Click “OK” to “Save” and exit “Extended Settings” window.
The “Epson Status Monitor 3” item is greyed out. This proves that you have successfully disabled the status monitor 3.

Why must we disable the status monitor before resetting the waste ink counter?
Disabling the Epson Status Monitor before resetting the waste ink counter with a tool like the WIC (Waste Ink Counter) Reset Utility is recommended for a few important reasons:
– Prevent Interference: The Epson Status Monitor is a software utility that constantly communicates with the printer to monitor its status, including ink levels and error messages. When you initiate a waste ink counter reset, the WIC Reset Utility sends specific commands to the printer’s firmware to reset the counter. However, if the Status Monitor is active, it may also try to communicate with the printer simultaneously, potentially causing conflicts and errors during the reset process.
– Minimize Errors: Disabling the Status Monitor ensures that no conflicting commands or data are being sent to the printer while you’re performing a critical operation like resetting the waste ink counter. This minimizes the chances of encountering errors, interruptions, or incomplete resets, which could lead to printer malfunctions or improper waste ink management.
– Smooth Reset Process: Resetting the waste ink counter is a delicate procedure, and any interruptions or errors can result in an incomplete reset. Properly disabling the Status Monitor creates a controlled environment for the reset utility to communicate with the printer firmware without external interference, increasing the likelihood of a successful reset.
– Best Practice: It’s a widely accepted best practice among technicians and printer experts to disable any printer monitoring or maintenance software when performing firmware-level actions like resetting the waste ink counter. This practice aids in preserving the integrity of the reset process and guarantees the successful achievement of its intended goal.
While disabling the Epson Status Monitor is an important step, remember to re-enable it after completing the waste ink counter reset. Once the counter has been reset, this will allow you to continue monitoring your printer’s status, including ink levels and error messages.
